Thursday, 23 September 2010

Kitchen front Ginger Cake: Recipe.

As well as having a passion for cooking I have a fascination with the second world war.

I used to love my Nana telling me her stories of the war: I love the fashion, have studied the art of the time and the war time spirit has me gripped.

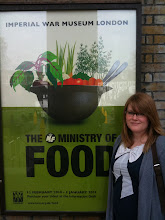
You can imagine my delight then when the Imperial War Museum opened the doors to it's latest temporary exhibition "The ministry of Food" (see the picture in my profile)

We visited The IWM show in February half term and it is wonderful, I urge you to go if you get the opportunity, it's on until the 3rd of January 2011.

I duly bought the book that accompanies the exhibition and promptly became too busy to cook anything from it - some of the recipes are less enticing than others however I was reminded of my desire to try some war time cooking when the October 2010 issue of Good Food landed on my door mat containing a recipe for the ginger cake Company of Cooks are selling at the Imperial War museum cafe.

I have made it once and it is stunning. I was surprised that there is as much cinnamon as ginger in the cake, and rather a lot of syrup but don't let that put you off!

I am going to try making the cake again this weekend using oil instead of margarine so my little lactose intolerant friend can try a slice - I'll report back on the results.

Kitchen Front Ginger Cake
Cuts into 14-16 slices - hey, families were larger in the 1940's, right?!

Ingredients
  • 300g margarine
  • 400g Golden Syrup
  • 1 egg, beaten
  • 130g Plain Flour
  • 225 Self Raising flour
  • 1 rounded Tsp of Ground ginger
  • 1 rounded Tsp of Cinnamon
  • A pinch of salt
  • 110g soft dark brown sugar
  • 1.5 tsp bicarbonate of soda
  • 175ml warm water

Method
  1. Heat the oven to 150 oC, line a 26cm cake tin.
  2. Gently melt the margarine and syrup in a pan.
  3. Place the flours, ginger, cinnamon, salt and sugar in a bowl or food mixer.
  4. Add the margarine and syrup to the dry mix and stir well, then add the egg.
  5. Disolve the bicarb in the warm water, then pour into the mixture, stirring continuously.
  6. Pour the mixture into the tin and smooth the top.
  7. Bake for 1 hour, a skewer inserted into the middle should come out clean. If not; cook for a further 5 minutes and re-try. This can be repeated until done.
  8. Turn out onto a cake rack to cool.
Enjoy!

PS - this post is dedicated to Lucy K who is full of blitz spirit. x

Teriyaki Chicken with egg-fried rice: Recipe

It's not often that I use "ready mades" or "cheat" products in the kitchen however a long, hard, day at work can make them a necessity.

I found this recipe for Teriyaki Chicken with Egg fried rice in the August 2010 edition of Delicious magazine and have made it at least 6 times - once for a large dinner party - and every time it's been complimented on its great flavours, colours and textures and is a quick, hearty and impressive dish.

This recipe uses pre-cooked basmati rice (I use the Tilda pouches) but I'm sure you could boil or steam rice if you have the inclination or the luxury of time.

Teriyaki chicken with egg-fried rice
Serves 2

Ingredients
  • 2 skinless chicken breasts, flattened slightly with a rolling pin.
  • 3 tbsp teriyaki marinade
  • 2 tbsp sesame oil
  • 250g Rice (I use Tilda Steamed Pure Basmati Rice)
  • 4 spring onions, finely chopped
  • 75g Frozen petit pois, defrosted
  • 50g roasted peppers in oil, drained and chopped or 1 fresh red pepper, diced.
  • 1 tbsp soy sauce
  • 1 large egg
  • Lime wedges to serve.

Method
  1. Place the chicken breasts in a bowl and coat in the teriyaki marinade and 1 tbsp of the sesame oil, cover and leave in the fridge for up to 20 mins.
  2. Heet a wok witht the remaining 1 tbsp of sesame oil. If using a fresh pepper stir fry it for a couple of minutes.
  3. Add the cooked rice to the wok and stir fry for 4 minutes.
  4. Heat a griddle pan or frying pan and cook the chicken on each side for 3-4 minutes or until cooked through.
  5. Add the spring onions, peas, roasted peppers (if using) and soy sauce to the rice and cook for a further 2 minutes.
  6. Add the egg to the rice and stir quickly to ensure that it scrambles through the rice.
  7. Serve the chicken on top of a pile of egg fried rice with a squeeze of lime juice over the top.
Quick, simple and delicious!
Enjoy!

Wednesday, 22 September 2010

Best Banana Bread: Recipe

I've been ill for the past couple of weeks but luckily whilst I was still well I knocked up one of my favourite banana bread loafs. It is a great recipe for using up browning bananas and is perfect as an on the go breakfast, a slice of mid afternoon snack or with a little cream or ice cream as a pudding. The cake also keeps really well if stored in an airtight container it can last up to a week so is a good investment to make on a sunday afternoon.... just don't expect there to be any left by Wednesday!

I have tried adding chocolate chunks instead of the nuts or leaving them out all together and it works equally well each way - it just depends what you have in your cupboards!

Best Banana Bread

Ingredients
  • 225 Self-raising white flour
  • 1/4 tsp bicarbonate of soda
  • 1/2 tsp salt
  • 75g Butter
  • 150g Caster sugar
  • 450g Ripe bananas
  • 2 Eggs
  • Optional - 125g chopped mixted nuts or Chocolate
  • Extra sugar for sprinkling on top.
Method
  1. Line a 1lb loaf tin with non stick baking parchment
  2. Pre heat the oven to 180 oC / 170 oC Fan ovens.
  3. Sift the flour, Bicarbonate of soda and salt together in a bowl.
  4. Rub in the butter then stir in the sugar.
  5. Mash the bananas then add them to the flour mixture with the eggs and chopped nuts / chocolate if using.
  6. Turn the mixture into the lined tin and sprinkle the top with sugar.
  7. Bake in the oven for 1- 1.25 hours or until a skewer inserted into the centre comes out clean.
  8. Leave in the tin to cool for 10 minutes, then transfer to a cooling rack to cool completely.
Enjoy!

Oat and Raisin Cookies: Recipe

I made this recipe as a healthier version of the much loved cookie, the occasion was a healthy eating and practical skills session I ran for some children from the local primary schools visiting our Village college for the day to "try out big school"

The oil is a healthier alternative to butter, Wholemeal flour replaces half of the less fibre-rich plain flour and the sugar content was reduced whilst the amount of raisins was increased whilst the taste and quality of the cookie have not been affected!

The cookies are lovely and fudgey whilst containing some healthy ingredients so indulging in them isn't so sinful, they have been enjoyed by adults and kids alike and are also suitable for dairy intolerant people. They really are hard to resist and incredibly more-ish!

The list of ingredients may seem a little long but stick with it, this recipe gives good results.

Makes roughly 12 cookies although the ingredients can be easily multiplied.

Oat and Raisin Cookies

Ingredients
  • 80g Wholemeal flour
  • 80g Plain white flour
  • 1 teaspoon of baking powder
  • 75ml Vegetable oil
  • 75g dark brown sugar (muscavado)
  • 7g Caster sugar
  • 1 egg
  • 1 teaspoon Vanilla Extract or Vanilla Flavour
  • 50g Rolled oats
  • 85g Raisins.

Method
  1. Pre heat the oven to 170 0c.
  2. Put both sugars in a mixing bowl and mash to remove any lumps.
  3. Add the vegetable oil, the vanilla extract and the egg to the sugars and whisk to remove any more lumps.
  4. Add the oats and raisins to the mix and stir with a wooden spoon to combine.
  5. Add the wholemeal flour to the mix and stir until combined.
  6. Add the baking powder and stir again.
  7. Add the plain flour a little at a time and stir until the mixture forms a soft dough.
  8. To form the cookies: ake 2 teaspoons of dough and roll them into a ball, place the dough balls onto a lined baking tray, leaving a gap between them.
  9. Bake in the oven for 16 minutes, rotating the tray half way through to give an even colour.
  10. Remove the cookies and cool on the tray for a few minutes until they have firmed a little and are easy to handle.
  11. Transfer the cookies to a cooling rack to cool completely.
Enjoy!

Review: Afternoon Tea at the Hilton Doubletrees, Cambridge.

In July, to celebrate my mums' birthday we went for afternoon tea at the Hilon Doubletrees hotel.

We dined in style and in a way in which my mother has taught me to do things: on a half price voucher deal (afternoon tea for 2 = £15 reduced from £30)

There were 3 of us, who had eaten nothing since brunch so we ordered 2 afternoon teas which turned out to be a bit over ambitious.


The afternoon tea came with delicate finger sandwiches; egg and cress, smoked salmon and ham and mustard but that was the extent of the savoury.
There were creme brulees and mini trifles, eaton mess, scones, jam and clotted cream and themed Biscuits dipped in chocolate. The picture above shows biscuit shoes, a dress and handbag, The picture below has biscuits in the shape of a bear and a slice of chocolate rocky road cake.

We washed it all down with lashings of early greay tea and soon began to suffer with a sugar head ache due to the very low savoury to sweet ratio!

It was a really nice treat and next time we'll know to order 1 tea between 3 people and stock up on sandwiches or pork pies first! Although it may be a little out of my price range without the voucher their offer is available until October 2010 with a coupon in Explorer magazine.


Ruth and her Everest

The Blue Egg

You know when you say something as a joke and it backfires? Well, that was the blue egg.

We were having a drink at the delightful Cambridge Blue on Gwydir Street when my friend joined us.
"I'm going to the bar" He says "Can I get you anything?"
I look at the bar and see a giant jar of pickled eggs which had been dyed blue "A blue egg!" I chuckle. Seems the joke was on me though.

Here it is in all it's disgusting glory:

There is a very good reason why most food isn't blue.
*shudder*

It's been a while...

Courgettes in the green house

I realise that is a gross understatement as it's actually been over 6 months since I updated this blog. Its been a very busy time: Moving house and planting up our new grden, planning our wedding, working hard and travelling the globe during the summer so there is lots to write up about. Consider this a bloggers IOU.

I'll start close to (our new) home:

The Kitchen Garden.
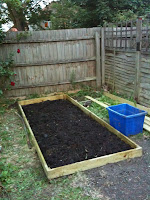
We moved in early June and have spent a large amount of time turning the overgrown scrub land at the back of the house into a tamed place to grow vegetables. So far we have eaten tomatoes and courgettes that we've grown and today I had some freshly picked lettuce in my lunch time sandwich.
Plants waiting to be put in the bed.
The first of 3 veg beds.


We raided the 2 grow bags of potatoes which hadn't been worked to their potential so only yielded a small quantitiy of spuds but they were tasty none the less and not at all disappointing as it's rewarding having grown anything, no matter how small!

This is all unbelievably exciting for 2 people who have spent the past few years in a first floor flat looking longingly at other peoples gardens. So much so that weeding still feels novel, although I'm not sure how much longer that'll last!

We already have sage growing in the garden along with one head of rhubarb that I'm very excited to see if it grows. We brought a few pots with us from the old flat: Chillis from Wahaca and some herbs: Rosemary, Bay and

Most of the veg that we planted will mature ready for late autumn or early winter with the exception of 2 aubergines the size of ping pong balls and a tiny green pepper that'll need eating before the month is out.

We've got a way to go before we're completely self sufficient but when the days become shorter we'll start to harvest the Brussel sprouts, leeks, Cabbage, Broccoli, Kale, Cauliflower and swede from the garden and in due course I'll post up some recipes for them too.

Monday, 29 March 2010

Chocolate Mayonnaise Cake: Recipe

About 10 years ago, whilst I was at sixth form college a girl in my class brought in a gorgeously moist looking chocolate cake (think Bruce Bogtrotter) boasting that it was made with mayonnaise.

Ever since then I've been meaning to make one of my own and so, in the quest for dairy free treats for my lactose intolerant lovely, I made one this weekend.

I searched for a recipe and found a promising looking one on the eco friendly website www.lovefoodhatewaste.com

Whilst making it I had some reservations, mainly about the hideously off-putting tuna mayo-esque stench of what is usually an irresisstable chocolatey goo (Are you trying to tell me you don't eat half the chocolate cake mix before it even makes it in to the tin?) But the final cake turned out so lush that it's well worth holding your nose and thinking of tea time.... and you've well and truly earned a slice after beating the mayo into the mix so hard you develop new arm muscles....

I accidentally added an extra teaspoon of the coffee granules to the icing which wasn't a disaster, it just added a nice dark mocha element to the cake.

I hope you enjoy it....

Chocolate Cake recipe from by Caroline Marson at www.lovefoodhatewaste.com

Makes a 18cm cake

  • 275g self raising flour
  • 225g caster sugar
  • 1½ teaspoons baking powder
  • 200g jar of mayonnaise
  • 4 tablespoons cocoa powder
  • 225ml boiling water
  • 1 teaspoon vanilla essence
For the icing:
  • 2 level teaspoons instant coffee
  • 2 level tablespoons cocoa powder
  • 2 tablespoons warm water
  • 75g butter
  • 225g icing sugar

Instructions

  1. Preheat the oven to 180°C (350°F) mark 4. Line an 18 cm cake tin with greaseproof paper.
  2. Sift the flour into a large mixing bowl and stir in the caster sugar and baking powder. Beat the mayonnaise well into the flour – it is very important to beat thoroughly into the dry ingredients.
  3. Dissolve the cocoa in the boiling water and stir this gently until it’s smooth. Add to the flour mixture with the vanilla essence and give it a quick stir. Stir everything thoroughly until all the ingredients are blended but this time don’t beat the mixture because that will spoil it. Just keep stirring it gently until all the lumps are gone.
  4. Pour the cake mixture into the tin. Bake for about an hour or until the center feels springy and a skewer comes out clean. Leave the cake in the tin to cool before turning out onto a wire rack.
  5. For the topping, dissolve 2 teaspoons of coffee and 2 tablespoons of cocoa in 2 tablespoons of hot water. Add the soft butter and the icing sugar.
  6. Beat the mixture thoroughly ensuring there are no lumps and spread it over the cake.

Sunday, 31 January 2010

Muffin Madness

Over the last month I have made several rounds of muffins which are great for speedy breakfasts or guilt free snacking. They are moist, filling and seem to suit any ingredients changes I throw at them.

The basic recipe I've been playing around with is one which I blogged in September last year:

http://eyesbiggerthanmybelly.blogspot.com/2009/09/back-to-school.html

I made a batch just after Christmas (recipe 1) when we had some pathetic looking carrots languishing in the bottom drawer of the fridge: this time however I grated the carrots instead of boiling and mashing them as:
1) that boiling and mashing them was far too much hassle and created more washing up and...
2) they've got to keep more of their nutrients if they're only cooked once, right?
I also used rolled oats in place of some of the flour and cranberries instead of the pineapple chunks.

The results were great and even better was the fact that they could be devoured by my lactose intolerant God Daughter.

The second batch I made when we had 2 bananas left over from pack lunches which were more black than yellow (recipe 2). So I whisked up a batch of muffins and took the opportunity to use up a bag of pecans which were nearing their sell by date. However in my haste and baking frenzy I added ground ginger to the mixture instead of ground cinnamon, surprisingly they tasted no worse for it!

I've got another batch of carrot and cranberry muffins in the oven now - this time i've used muffin cases instead of fiddling around cutting baking parchment into squares and forcing it into the muffin trays which was akin to wrestling an octopus. I also had to improvise with plain flour and bicarb of soda as i've run out self raising. It doesn't seem to have affected the outcome; these muffins are just great for adapting to what ever you have in your cupboards.

Carrot and cranberry muffins (Recipe 1)
140g self raising flour
30g wholemeal flour
a pinch of salt
55g rolled oats (plus a little extra to scatter on top of the muffins)
1/2 tsp bicarbonate of soda
2 tsp ground cinnamon
150ml sunflower oil
100g golden caster sugar
2 carrots, grated
100g dried cranberries
2 tbsp fruit juice (orange works well)
1 egg
1tsp vanilla extract

1) Pre heat the oven to 200 oC or 180 oC for a fan oven
2) Line a 12 hole muffin tin with muffin cases or squares of non stick baking parchment
3) Sift together the flours, add the salt, bicarb, cinnamon and oats.
4) In another bowl beat the oil with the caster sugar and add the grated carrots, cranberries, fruit juice, egg and vanilla extract.
5) Fold the dry mix into the wet one
6) Spoon the mix into the muffin cases and add a pinch of oats to the top of each muffin
7) Bake in the oven for 20 - 25 minutes or until a skewer comes out clean.


Banana, Pecan and Ginger Muffins (recipe 2)
140g self raising flour
30g wholemeal flour
a pinch of salt
55g rolled oats (plus a little extra to scatter on top of the muffins)
1/2 tsp bicarbonate of soda
2 tsp ground ginger
150ml sunflower oil
100g golden caster sugar
2 bananas, mashed
200g pecans, broken into small pieces
2 tbsp honey
1 egg
1tsp vanilla extract

1) Pre heat the oven to 200 oC or 180 oC for a fan oven
2) Line a 12 hole muffin tin with muffin cases or squares of non stick baking parchment
3) Sift together the flours, add the salt, bicarb, ground ginger and oats.
4) In another bowl beat the oil with the caster sugar and add the mashed bananas, pecans, honey, egg and vanilla extract.
5) Fold the dry mix into the wet one
6) Spoon the mix into the muffin cases and add a pinch of oats to the top of each muffin
7) Bake in the oven for 20 - 25 minutes or until a skewer comes out clean.

Sunday, 10 January 2010

Pilau Rice - the perfect pulao.

One of the biggest gastronomic sacrifices I've made in moving from the hustle and bustle of London to the wilds of a Cambridgeshire village is the ease of access to an abundant supply of fine take away establishments. I often get a hankering for an authentic curry, especially at the weekend and although I enjoy cooking curries the joy of a curry is in all the condiments and extra sides and I haven't braved making my own Naan bread to give the true curry indulgence experience.

This recipe for Pilau rice (or "Classic Pulao") goes some way towards softening the blow of having to fake the authenticity of the indian dishes we eat and helps to recreate the proper curry house takeaway experience. Coupled with the Slow cooker Kashmiri Chicken this rice makes for a wonderful meal.

I found this recipe in a'Flipcook' book that my mum bought for me from 'The Book People'. It's in a genius flip chart format and is called "Curries of the world". I haven't really used it for much else but this recipe is well fingered (and oiled) as it is easy to make after you've made it once. Don't be put off by the long list of ingredients, as with a lot of Indian cooking the amount of different spices is plentiful but the amount of each spice is small.

The recipe is easily halved or doubled but when halving I do tend to keep the amount of onion, cashew nuts and sultanas the same, but that's just because I'm a greedy guts!

The recipe states that "...the secret of a perfect pulao is to wash the rice thoroughly, then soak it briefly. Soaking before cooking softens and moistens the grains, enabling the rice to absorb moisture during cooking and resulting in fluffier rice." I tried this once and now always soak rice before cooking, it totally eliminates the possibility of bad rice (whether water logged or sticky) and it reduces the cooking time but about half as well!

Classic Pulao
Serves: 4 - easily halved or doubled

Ingredients
600ml hot chicken stock
A generous pinch of saffron threads
50g butter
1 onion, chopped
1 garlic clove, crushed
2.5cm piece cinnamon stick
6 green cardamom pods
1 bay leaf
250g basmati rice, soaked for 20 - 30 mins
50g sultanas
15ml vegetable oil (optional)
50g cashew nuts

Method
1) Pour the hot chicken stock into a jug and add the saffron threads then set aside.
2) Heat the butter in a large saucepan and fry the onion and garlic for 5 minutes.
3) Stir in the cinnamon stick, cardamoms and bay leaf and cook for 2 more minutes.
4) Drain the rice and add it to the saucepan, then cook, stirring, for 2 minutes.
5) Pour in the stock and saffron and add the sultanas. Bring to the boil, stir, then lower the heat. Cover and cook gently for 10 minutes or until the rice is tender and all the liquid has been absorbed.
6) Meanwhile, fry the cashew nuts in a wok or frying pan. You can fry them in the vegetable oil but I prefer to dry toast them. Sprinkle the nuts over the rice to serve.

Enjoy!

Slow Cooker Recipe: Peppered Venison with Gorgonzola Scones

This recipe caught my eye with the alternative to dumplings: the mighty scone!

It was another Christmas holiday experiment which was engineered to use up a packet of diced Venison I had bought, reduced months ago and stored in the freezer. I didn't actually have enough Venison so I made up the quantity of meat with some diced beef. I think this was a wise move as I can't imagine how rich this stew would be if made purely with venison! I also halved the recipe as there were only 2 of us eating it and it still yields a very generous amount of stew and scone.

We ate this for dinner on New Years Eve and it set us up for an evening of sipping champagne and dancing around like fools. The main catch to this recipe, or the hardest part for me to do after a night of too much red wine, was pouring red wine into the slow cooker before I'd even had breakfast. I'm sure the more self restrained amongst you won't have this problem!

Peppered Venison with Gorgonzola Scones
Serves: 4-5
Preparation time: 35 mins
Cooking time: 8-11 hours
Cooking temp: Low

Ingredients
For the stew:
25 g butter
1 tbsp olive oil
750g diced venison shoulder (I used 350g venison and 400g beef)
1 large red onion, sliced
125g cup mushrooms, sliced
2 cloves garlic, finely chopped
2 tbsp plain flour
200ml red wine
250ml lamb or chicken stock
2 tsp tomato puree
2 tbsp redcurrant jelly
1 tsp peppercorns, roughly crushed
salt and pepper
green beans to serve.

For the Scone:
250g self-raising flour
40g butter, diced
125g Gorgonzola cheese, rind removed and diced
3 tbsp chopped parsley or chives
1 egg, beaten
4-5tbsp milk

Method
1) Preheat the slow cooker.
2) Heat the butter and oil in a large frying pan, add the diced venison (and other meat if using) a few pieces at a time, until all the meat has been added, fry until it is evenly browned. Transfer to a plate.
3) Add the onion to the frying pan and fry for 5 minutes.
4) Stir in the mushrooms, garlic and flour and cook for 1 minute.
5) Stir in the stock, wine, tomato puree, redcurrant jelly, peppercorns and salt and bring the mixture to the boil.
6) Spoon the venison into the slow cooker, add the hot wine mixture and press the meat below the surface of the juice. Cover and cook on low for 8 - 10 hours.
7) To make the scones: Place the flour in a bowl, add the butter and rub in with your fingertips until the mixture resembles fine breadcrumbs (TOP TIP: If you're not sure if you have reached this stage, give the bowl a shake and any large, un-rubbed-in lumps will rise to the top)
8) Stir in to the flour and butter a little salt and pepper, the cheese and herbs.
9) Reserve 1 tbsp of egg for glazing the scone and add the rest to the flour mix.
10) Gradually stir in enough milk to make a soft dough (TOP TIP: it is best to add the milk a teaspoon at a time to avoid getting a soggy mix)
11) Lightly knead the dough on a floured surface then pat it into a thick oval or round which is a little smaller that the top of your slow cooker. Cut the dough into 8 wedges and arrange them, spaced slightly apart, on top of the stew. Cover and cook on high heat setting for 45 mins - 1 hour.
12) Brush the scones with the reserved egg and brown under the grill. Serve with green beans.

Enjoy!

This recipe was taken from Ultimate Slow Cooker by Sara Lewis.

Slow Cooker Recipe: Kashmiri Butter Chicken

When I live in London we had 3 take away restaurants across the road from our flat. One was a kebab shop which claimed to be "the second best kebab shop in London" which always provided us with brilliant and much needed greasy, spicy food to soak up the booze after a long night on the tiles. The second was a Chinese take away that produced the most awful food known to man (a shame as it was the weak link in what could have been the holy trinity of takeaways). Last in the row was an excellent and cheap Curry house. We bought many a takeaway from them over the years of living there: me with my love of a Korma and Peshwari Naan and my house mate with the more adventurous palate of someone who had travelled around India always chose something a little different...

One day a new chef's special was listed: Butter Chicken. My friend ordered it, I tried some and it was delicious. Like a more tomatoey version of a Korma but without the almonds (so I'm guessing less calorific too!) very mild with lots of subtle flavours I have searched for this dish every time we have a take away curry but to no avail. So you can imagine how pleased I was when I found this recipe in my new slow cooker book*!

Kashmiri Butter Chicken
Serves: 4
Preparation time: 30 mins
Cooking time 5-7 hours
Cooking temp: Low

Ingredients
2 onions, quatered
3 garlic cloves
4cm fresh root ginger, peeled.
1 large red chilli, halved, seeds discarded
8 boneless, skinless chicken thighs
1 tbsp sunflower oil
25g butter
1 tsp cumin seeds, crushed
1 tsp fennel seeds, crushed
4 cardamom pods, crushed
1 tsp paprika
1 tsp ground turmeric
1/4 tsp ground cinnamon
300ml chicken stock
1 tbsp light muscavado sugar
2 tbsp tomato puree
5 tbsp double cream
salt

Method
1) Preheat the slow cooker.
2) Blend the onions, garlic, ginger and chilli in a food processor or liquidizer or chop finely.
3) Cut each chicken thigh into 4 pieces. Heat the oil in a large frying pan and add the chicken, a few pieces at a time, until all the meat has been added. Cook over a high heat until evenly browned. Lift the chicken pieces out of the pan with a slotted spoon and transfer to a plate.
4) Add the butter to the frying pan and when it has melted add the onion paste. Cook over a more moderate heat until it is just beginning to colour. Stir in the crushed seeds, cardamom seeds and pods and ground spices. Cook for 1 minute, then mix in the stock, sugar, tomato puree and salt. Bring to the boil, stirring.
5) Transfer the chicken to the slow cooker pot, pour the onion mixture and sauce over the top and press the chicken below the surface of the liquid. Cover and cook for 5 - 7 hours.
6) Before serving, stir in the cream and garnish with toasted flaked almonds and sprigs or coriander.

Enjoy!

*recipe from Ultimate Slow Cooker by Sara Lewis.

Slow Cooker Recipe: Venison sausage and Puy lentil Stew

I got 2 copies of the same slow cooker recipe book for Christmas, just goes to show how well my nearest and dearest know me! I was able to use my holiday time productively and try out a few of the recipes from the book which all turned out really well.
The book is Ultimate Slow Cooker by Sara Lewis, published by Hamlyn.

I'm still trying to get over the disappointment that came from realising most of these recipes require you to "brown the meat" and "fry the vegetables" before adding them to the slow cooker - that shattered any naive illusions I had of this being a piece of wonder kit that toiled silently turning raw ingredients into delicious dishes. However delicious dishes have come forth from it and it also fills the house with a delicious aroma too. So, it's not all bad!

I chose this recipe to use up some Venison sausages I bought, reduced, in November and had stashed in the freezer. It also had a lovely festive feel with the cranberries and at this time of year I was easily able to buy fresh ones. The only snag to this recipe was getting hold of the Puy lentils: I had to send the other half on a special mission to Waitrose as our local Tesco doesn't stock them. However every cloud has a silver lining and through my search for the perfect (or correct!) lentil I've stumbled across the Merchant Gourmet website which I will be frequenting from now on...


Venison sausage and Puy lentil stew (I halved this recipe which worked fine)
Serves: 4
Cooking time: 6-7 hours
Cooking temp: Low

1 Tbsp Olive oil
8 Venison sausages
1 large Onion
2 Garlic cloves, chopped
2 tbsp Plain flour
900ml Chicken stock
3 Tbsp Brown Sugar
2 Tbsp Tomato puree
2 Tbsp Balsamic vinegar
200g Puy lentils
250g Cranberries, defrosted if frozen
2 Bay leaves
salt and pepper.

Method:
1) Preheat the slow cooker.
2) Heat the oil in a frying pan, add the sausages and cook on a high heat until browned all over but not cooked through. Transfer to a plate.
3) Add the onion to the pan and fry until lightly browned, add the garlic, then the flour.
4) Stir in the stock, sugar, tomato puree and vinegar, season with salt and pepper and bring to the boil.
5)Put the lentils, cranberries and bay leaves in the slow cooker pot, pour over the hot stock mixture and add the sausages.
6) Cover with a lid and cook on low for 6-7 hours.
7) Stir well then spoon into shallow dishes, discarding the bay leaves, serve with warm crusty bread or a selection of green vegetables.
I also stirred in a little redcurrant jelly as we had a jar open from Christmas, cranberry jelly/sauce would go well and just take the edge off the tart cranberries in the stew.

Enjoy!